.avif)


How to Measure for Replacement Impact Windows the Right Way
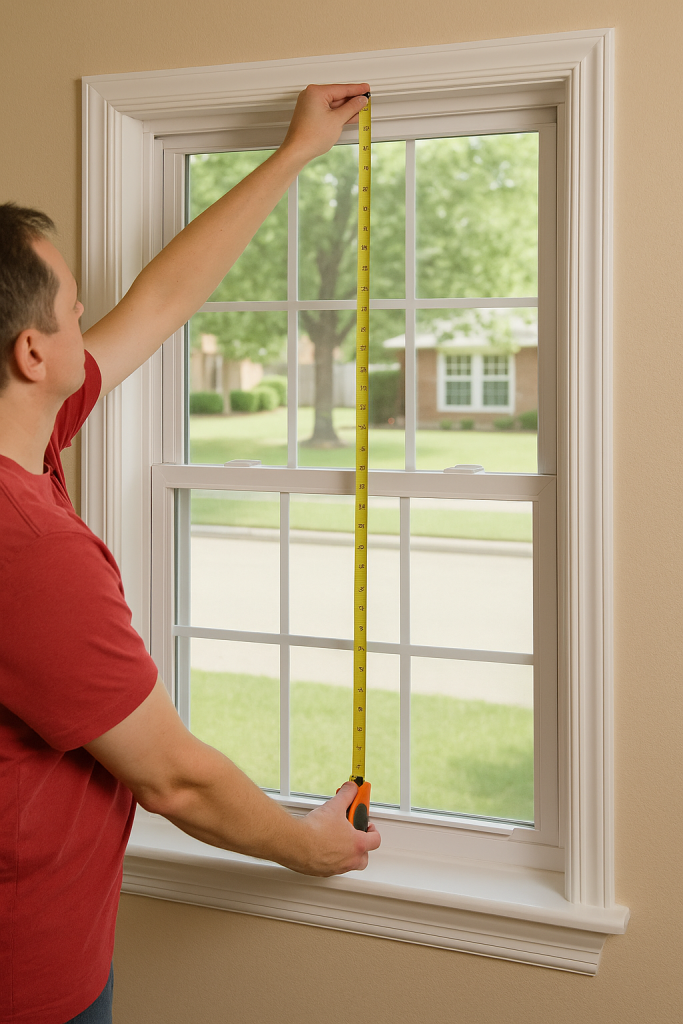

Measuring for replacement impact windows means working from inside the home, taking three width readings and three height readings across each opening, using the smallest number from each set, confirming at least 3 1/4 inches of frame depth, and comparing both diagonals to check whether the opening is square. Below we walk through each step, explain who applies the size allowance and why deducting it yourself is expensive, cover how a concrete block opening differs from the wood-frame openings most guides describe, and show where measurements stop being a fit question and start being a code question.
Key Takeaways
- Measure from inside, three readings per dimension, and order from the smallest.
- Round down to the nearest 1/8 inch. Never round up.
- The manufacturer applies the size allowance, not you. Polaris builds units 1/4 inch under the measured width.
- Deducting on your own initiative on top of that produces a unit up to half an inch undersized.
- Diagonals within 1/8 inch indicate a square opening, which is the stricter of the two published tolerances.
- An insert replacement needs at least 3 1/4 inches of jamb depth, and inserts rarely apply to impact work.
- Product approvals list maximum tested dimensions, so a unit can fit an opening and still be unpermittable.
- Bedroom openings have to meet emergency escape minimums, which caps how small a replacement can go.
What Is the Proper Way to Measure for Replacement Windows?
The proper way to measure for replacement windows is to work from inside the home, take three readings across each dimension, and order from the smallest number in each set. Every credible source in this category agrees on that sequence, and it exists because almost no opening in a real house is perfectly square.
Square openings are the exception rather than the rule. Buildings settle, framing moves, and masonry shifts, so an opening that measures 36 inches at the top can measure 35 and 3/4 at the bottom. A unit built to the larger number will not enter the opening at all, while a unit built to the smaller number goes in and gets shimmed.
Shimming is normal and expected. What follows is the full procedure, and we should say at the outset that on a permitted job the contractor takes these measurements as part of the submittal. Reading through it still pays off, because it tells you what a competent measurement visit for impact windows should actually include.
What Are the Parts of a Window Frame?
The parts of a window frame you need to know before measuring are the head, the jambs, the sill, the stool, and the stops. Manufacturers use these terms on order forms, and a measurement taken to the wrong reference point produces the wrong number.
The wrong reference point is usually the trim. Here is what each term means. The head is the horizontal member across the top of the frame. The jambs are the two vertical members at the sides. The sill is the horizontal member at the bottom, sloped to shed water. The stool is the interior shelf that sits on top of the sill, the part people rest a coffee cup on. The stops are the narrow strips that hold the sash in place.
Holding the sash in place is also why stops get removed during a replacement, which is why depth gets measured between them rather than to them. The glass package inside that frame is a separate specification entirely, and on an impact unit the impact glass makeup is called out on its own line of the order.
What Tools Do You Need to Measure a Window?
The tools you need to measure a window are a steel tape measure, a level, and something to write on. Nothing on this list is specialized, and the accuracy comes from method rather than equipment.
Method aside, a few items make the job faster and the numbers more reliable:
- A steel tape measure rather than a cloth or fiberglass tape, since fabric stretches and produces readings that drift
- A two-foot or four-foot level for checking whether the sill is level and the jambs are plumb
- A pencil and a written record, with a separate line for every opening rather than one running list
- A phone camera to photograph each opening alongside its written measurements
- A step stool for reaching the head on tall openings without stretching the tape at an angle
- A second person for anything wide, because a sagging tape reads long
A tape reading long is one of the quieter sources of error in this whole process, and it happens most often on wide openings measured alone. Keeping the tape flat against the surface matters more than which brand of tape it is.
How to Measure Window Width
Measure window width from jamb to jamb at three heights, then record the smallest of the three. Measuring to the trim or to the drywall gives a number larger than the actual opening and produces a unit that will not fit.
The actual opening is captured in six steps:
- Work from inside the home and open the sash so you can reach the full frame.
- Measure horizontally from the face of one side jamb to the face of the other, near the top of the opening.
- Repeat the same measurement at the middle of the opening.
- Repeat once more near the bottom, just above the stool.
- Write down all three numbers rather than only the one you expect to use.
- Take the smallest of the three and round it down to the nearest 1/8 inch.
Rounding down rather than up is the rule throughout, and it applies even when the reading lands almost exactly on a mark. A window slightly too small gets shimmed and sealed. A window slightly too large gets sent back.
How to Measure Window Height
Measure window height from the highest point of the sill to the underside of the head, at three horizontal positions, and record the smallest. The reference at the bottom is the specific detail people get wrong.
Getting it wrong happens because sills are sloped. Water needs to run off, so the sill pitches toward the exterior, which means the sill has a high point and a low point. Polaris Windows specifies measuring from the highest point of the sill where it meets the stool, and that high point is what the new unit will sit against.
Sitting against the high point, the unit needs clearance above it, which is why the three readings get taken at the left, the center, and the right, and why the smallest governs. Warping in an older frame will show up as a spread between those three numbers, and visible frame warping is a signal that the opening itself may need attention before anything new goes into it.
How to Measure Window Depth
Measure window depth from the inside edge of the interior stop to the inside edge of the exterior stop, and confirm you have at least 3 1/4 inches. Lowe's, Andersen, and Window World all publish the same 3 1/4 inch threshold, which makes it one of the firmest numbers in this category.
The firmest numbers are still conditional. That 3 1/4 inches is the depth an insert replacement needs in order to seat inside an existing frame. Pulleys, tracks, and parting strips are excluded from the measurement, because those components come out during installation and the space they occupied becomes available.
Available space runs out fast on shallow frames, and a frame under 3 1/4 inches deep rules out an insert entirely. That finding changes the whole scope of the project, which is why depth belongs in the first round of measurements rather than being discovered on installation day.
How to Check If a Window Opening Is Square
Check if a window opening is square by measuring both diagonals and comparing them, working to a tolerance of 1/8 inch. Published guidance splits on this number and the conservative figure is the one to use.
The split runs two against two. Andersen and Polaris both put the tolerance at 1/8 inch. Lowe's and Window World both say a difference up to 1/4 inch is typically acceptable. Andersen and Polaris are manufacturers writing to a fabrication spec, and the other two are retailers writing consumer guidance, so we work to 1/8 inch and treat anything beyond that as a condition to solve rather than absorb.
Solving it has a specific method. Polaris specifies that where diagonals differ by more than 1/8 inch, the unit gets ordered narrower in width to compensate, so it can be set plumb inside an opening that is not. Lowe's describes the same correction from the other direction, running a level down a jamb, noting how far it has to move to reach plumb, and adding that distance into the calculation. Forcing a square unit into an out-of-square opening binds the sash and stresses the frame.
Do Replacement Windows Need to Be Exact Size?
Replacement windows do not need to be the exact size of the opening, because the manufacturer builds in a clearance allowance, and this is where the most expensive mistake in the whole process happens. Nearly every measuring guide tells readers to record the smallest number without ever saying who subtracts what from it.
Who subtracts what is documented clearly by Polaris Windows and almost nowhere else. Polaris builds the unit 1/4 inch under the measured width, leaving 1/8 inch of play on each side to accommodate an opening that is not perfectly square. On height, the unit comes 1/4 inch under with no head expander, or 3/4 inch under when a head expander is included.
Included in that allowance is everything the installer needs to shim and plumb the frame. So a homeowner who helpfully subtracts another 1/4 inch before submitting their numbers ends up with a unit half an inch narrower than the opening, with a gap too wide to seal properly. Report the raw smallest measurement and let the factory apply its own allowance. Allowances differ between manufacturers, which is one more reason not to guess at them.
Should You Measure From the Inside or the Outside?
You should measure from the inside for a replacement window, because the interior face of the frame is what the new unit seats against. All four of the guides we reviewed specify interior measurement, and they do it for the same reason.
The same reason is that exterior conditions lie. Siding, brick veneer, stucco, and trim all overlap the structural opening by varying amounts, so an exterior measurement captures the finish rather than the frame. Interior measurement reaches the actual jamb faces.
Actual jamb faces are not always accessible, which is the exception worth naming. On some retrofit conditions, particularly masonry, the installer will also take exterior dimensions to confirm the fin or flange detail and the finish return. Those are supplementary readings taken alongside the interior set rather than instead of it.
How to Measure a Masonry Opening
Measure a masonry opening to the structural block or to the wood buck, rather than to the stucco return or the interior finish. This is the step where national measuring guides stop being useful in South Florida.
South Florida homes are predominantly concrete block, and the standard guidance about interior stops, exterior stops, parting strips, and sash pulleys describes a wood-frame double-hung in a northern house. A block opening has none of those components. What it has instead is a structural opening, a possible wood buck fastened to the block, and a stucco return that laps the outside edge.
The outside edge is where confusion starts, because stucco can hide anywhere from a quarter inch to over an inch of the structural opening. Whether a buck is present, and whether it is a 1x or a 2x, changes both the reference surface and the anchoring detail the approval will require. For homes in Doral this is the single biggest difference between a useful measurement and a useless one. The same conditions govern commercial impact windows, where openings are frequently direct-to-block with no buck at all.
Insert or Full-Frame: Which Applies to Impact Windows?
Between insert and full-frame, it is full-frame replacement that applies to impact windows in nearly every case, because the approval covers the frame and its anchorage as one tested assembly. National guides recommend inserts as the money-saving option, and that advice does not transfer to impact work.
Transfer fails at the approval. An insert replacement leaves the original frame in the wall and fits a new unit inside it, which means the new window is anchored to old material rather than to the structure in the way the test protocol required. A product approval documents a specific frame, specific fasteners, specific spacing, and a specific substrate. Anchoring into a legacy frame is not the tested condition.
The tested condition is what a permit is issued against, so an impact window replacement almost always removes the old frame down to the structural opening. That is more labor and more finish work than an insert, and it is what makes the assembly permittable. Anyone quoted an insert-style impact retrofit should ask specifically which approval covers that installation method.
Why Your Measurements Affect Code Compliance, Not Just Fit
Your measurements affect code compliance because product approvals list maximum tested dimensions, so a unit can fit an opening perfectly and still be impossible to permit. Not one of the four measuring guides we reviewed mentions this, and in a High-Velocity Hurricane Zone it decides whether a project moves forward.
Moving forward depends on two things the dimensions feed. The first is the approval itself, which lists the largest size at which each configuration was tested and passed. Order beyond that size and the approval no longer covers the unit. The second is design pressure, calculated per opening from building height, exposure, and position on the wall, with Florida Building Code Section 1620.2 setting the starting wind speed at 175 miles per hour in Miami-Dade County and 170 in Broward.
Broward and Miami-Dade both sit inside the zone where every opening needs protection tested under Miami-Dade TAS 201, which fires a 9-pound 2x4 at 50 feet per second at the assembly. Larger openings present more area to the load, so size and pressure rating move together. How wind pressure behaves across a building is the reason two identical-looking windows on the same house can require different products.
How Egress Requirements Limit Your Options
Egress requirements limit your options by setting a floor on how small a bedroom window can be, and they can rule out a replacement that would otherwise fit. Andersen raises this in one sentence without numbers, and the numbers are what make it actionable.
The actionable figures come from the International Residential Code, which requires emergency escape and rescue openings in sleeping rooms to provide:
- 5.7 square feet of net clear opening, reduced to 5.0 square feet for openings at grade floor level
- 24 inches minimum net clear opening height
- 20 inches minimum net clear opening width
- A sill no more than 44 inches above the finished floor
Net clear opening is the operable area a person can actually pass through, not the size of the unit, so frame and sash width both eat into it. A replacement with heavier frame members can shrink the clear opening below the minimum even in an unchanged rough opening. The same net-versus-nominal distinction applies to sliding glass doors, where the walkthrough is far narrower than the stated width.
What Are Common Window Replacement Mistakes?
The most common window replacement mistakes are measuring once, using the wrong reading, deducting the size yourself, and skipping the square and depth checks. Every one of them shows up after the unit has been custom-built, which is when they cost the most.
Costing the most is the pattern here, because these units are made to order rather than pulled from a shelf. The table below covers what goes wrong and how to prevent it.
Common Mistake
What It Causes
How to Avoid It
Measuring only once
A single error carried through to a custom-built unit
Take three readings per dimension and record all three
Using the largest reading
A unit too wide or too tall to enter the opening
Always order from the smallest reading
Deducting the allowance yourself
A unit up to half an inch undersized with gaps too wide to seal
Report raw measurements and let the factory apply its allowance
Rounding up
A unit that binds or will not seat at all
Round down to the nearest 1/8 inch every time
Measuring to trim or drywall
A number larger than the real opening
Measure jamb to jamb, and to block or buck on masonry
Assuming matching windows match
Two units ordered alike, one of which does not fit
Measure every opening separately, even side by side
Skipping the diagonal check
A square unit forced into an out-of-square opening, binding the sash
Compare both diagonals and work to 1/8 inch
Skipping the depth check
Discovering on install day that the frame cannot seat
Confirm at least 3 1/4 inches before ordering anything
Ignoring the approval size limits
A unit that fits the opening but cannot be permitted
Check the maximum tested dimensions on the product approval
Sources: measurement procedure and tolerances per published guidance from Lowe's, Andersen Windows, and Window World; manufacturing allowance figures per Polaris Windows measuring instructions; approval size limits per Florida Building Commission and Miami-Dade County product control requirements. Manufacturing allowances vary between manufacturers.
Between all nine, the ones that turn up most often on the projects we inherit are the deduction error and the skipped depth check. Homes still carrying older windows tend to have shallow frames, and depth surprises are common in that housing stock.
How Do I Avoid Common Window Measurement Mistakes?
You avoid common window measurement mistakes by recording everything, measuring twice on separate occasions, and resisting the urge to interpret your own numbers. Interpretation is where most errors enter.
Errors enter when a measurer decides a reading looks wrong and adjusts it, or subtracts a clearance they think is needed, or averages three numbers instead of taking the smallest. Raw data submitted honestly gives the manufacturer and the installer what they need. Edited data hides the very variation the process exists to catch.
Catching variation is also why a second pass matters. Measure the whole house, then measure it again on a different day, and compare the two sets. Any opening where the two sets disagree gets a third look. On high-rise windows a second pass is standard practice rather than an abundance of caution, because access alone makes a return trip expensive.
When the Contractor Should Do the Measuring
The contractor should do the measuring on any permitted job, because the dimensions become part of the submittal that the building department reviews. That is a different exercise from measuring to compare quotes, and both have their place.
Their place divides cleanly. Measuring yourself gives you a working sense of scope, lets you compare proposals on equal terms, and tells you whether a quote is describing your house. Measuring for the order carries liability, because a unit built to a wrong dimension is a custom product that cannot be returned.
Returning custom product is not an option, so a professional measurement visit covers more ground than a tape measure alone:
- Confirm construction type and buck condition at every opening, since block, block with buck, and frame all measure differently.
- Record width, height, depth, both diagonals, plumb at the jambs, and level at the sill for each opening.
- Calculate the design pressure required at each opening from height, exposure, and wall zone.
- Select products whose approval covers that pressure at that size and configuration.
- Verify that bedroom openings still meet emergency escape minimums after the new frame is accounted for.
- Assemble the submittal package with approval documents and anchoring details for the permit.
Assembling that package is the part homeowners rarely see and the part the permit turns on. Every set of impact-rated windows we install is measured against that six-step process rather than against a number written on a business card.
Frequently Asked Questions
What Mistakes Should You Avoid When Measuring?
The mistakes you should avoid when measuring are rounding up, averaging your readings, measuring to the trim, subtracting a clearance allowance yourself, and assuming two similar openings are identical. Each one produces a custom unit that cannot be returned. Record raw numbers, round down to the nearest 1/8 inch, and treat every opening as its own job.
How Do You Get the Most Accurate Measurements?
You get the most accurate measurements by using a steel tape held flat against the surface, taking three readings per dimension, and measuring the whole house twice on separate days. A sagging tape reads long, which is why a second person helps on wide openings. Photograph each opening alongside its written numbers so you can resolve any disagreement later.
How Can You Tell If Windows Were Installed Incorrectly?
You can tell windows were installed incorrectly by looking for a sash that binds or will not lock, uneven gaps between the sash and the frame, visible daylight at the perimeter, water staining below the sill, and drafts you can feel with a hand. An out-of-square installation usually shows as a gap that tapers from one end of the sash to the other.
How Thick Are Replacement Windows?
Replacement windows are typically 3 to 4 inches thick at the frame, and an insert replacement needs at least 3 1/4 inches of existing jamb depth to seat correctly. Impact-rated frames tend toward the deeper end of that range because the frame members are reinforced and the glass package is thicker than standard glazing.
How Are Replacement Windows Installed?
Replacement windows are installed by removing the old sash and, on a full-frame job, the old frame down to the structural opening, then setting the new unit, shimming it plumb and level, anchoring it to the fastener schedule the product approval specifies, sealing the perimeter, and restoring the interior and exterior finish. The anchoring step is what the inspector checks against the approval.
Can You Measure Retrofit Windows the Same Way?
You can measure retrofit windows using the same width, height, depth, and diagonal method, and the reference surfaces change depending on what stays in the wall. A retrofit that keeps an existing frame measures to that frame, while a full-frame retrofit measures to the structural opening. Establish which type the project is before recording a single number.
Getting the Numbers Right
Measuring a replacement window is a short procedure with very little room for improvisation. Work from inside, take three readings for width and three for height, use the smallest of each, round down to the nearest 1/8 inch, confirm at least 3 1/4 inches of depth, and compare both diagonals against a 1/8 inch tolerance. Record every opening separately and photograph as you go.
The step that costs people money is the one almost nobody explains. The manufacturer already subtracts a clearance allowance from your numbers, so submitting a figure you have already reduced yourself produces a window that will not fill the opening. Report what the tape says and let the factory do its own arithmetic.
Beyond fit, the dimensions carry weight the national guides never mention. A product approval lists the largest size at which a configuration was tested, design pressure is calculated opening by opening, and a bedroom window still has to clear the emergency escape minimums after the new frame takes its share. A window can fit an opening beautifully and still fail a permit review.
Our team at ASP Windows & Doors measures openings as part of the submittal rather than as a sales step, with structural engineers available on the projects that call for one.
Measuring yourself is a reasonable way to understand your own project and compare proposals honestly, and we would rather you did than not. The Doral showroom can also walk you through what a full-frame retrofit actually involves in a block home. When you are ready to have your openings measured for the order, request a free estimate and we will take it from there.
Now Accepting Appointments
Proudly serving homeowners and businesses across South Florida and Southwest Florida. Book your visit and let our experts help protect and upgrade your space.
.avif)
.avif)
.avif)
%201.avif)
Insights & Resources
Stay informed with expert tips on impact windows, hurricane protection, and South Florida building standards.


%201.webp)
%201%20(1).webp)

%201.svg)
%201%20(1)%20(1).webp)
.png%20(1).webp)
.png.webp)
.avif)
.avif)


.avif)


.png)
.png)