.avif)


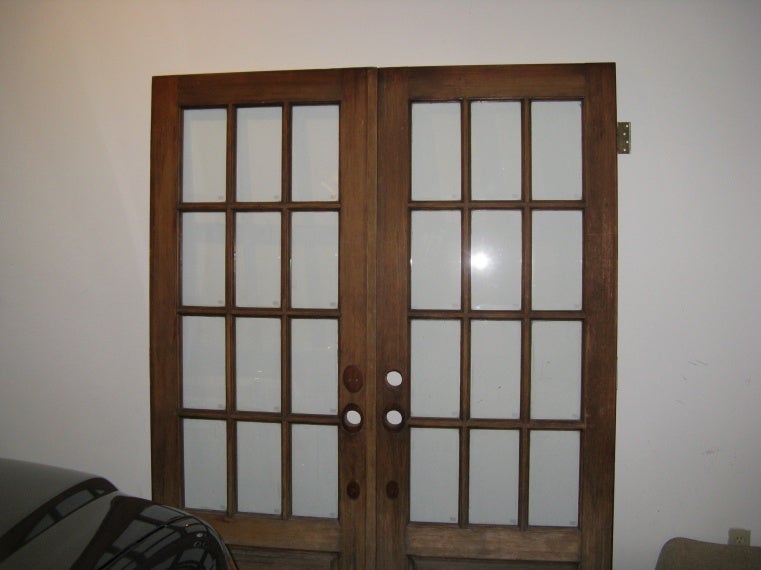

Installing French doors follows a step-by-step sequence: measure the rough opening, verify or build the framing, set the pre-hung unit into the opening, shim it plumb and level on both the hinge side and the strike side, secure the frame to the structural framing with 3-inch screws, insulate the gaps with low-expansion foam, install the astragal and hardware, apply weatherstripping, and finish with interior and exterior trim. The residential French door segment accounts for 72% of the global market, according to GM Insights, and pre-hung installation is the method used for the vast majority of those units because the frame, hinges, and threshold arrive as a single assembly ready to drop into a prepared opening.
This article walks through the full installation process for both interior and exterior French doors, covering rough opening dimensions, framing, shimming techniques, gap specifications, astragal sealing, multi-point lock installation, and the common mistakes that cause doors to bind, leak, or fail inspection.
Key Takeaways
- Pre-hung French door installation takes 4 to 8 hours with a two-person crew, depending on whether the opening is new or existing.
- The rough opening for a standard 6-foot (72-inch) French door should measure approximately 74 inches wide by 82.5 inches tall.
- Shims must be placed at every hinge location and every 12 to 16 inches along the frame to prevent bowing and maintain a consistent 1/8- to 3/16-inch reveal gap.
- Low-expansion spray foam is required around the frame; standard expanding foam generates enough pressure to bow the jambs and prevent the doors from closing.
- The astragal is the vertical strip that seals the gap where the two panels meet and houses the flush bolts and strike plates for the locking system.
- Exterior French door installation in Florida requires a building permit, a sill pan for waterproofing, and products that carry Florida Product Approval or Miami-Dade NOA certification in the HVHZ.
- The U.S. Department of Energy reports that doors and windows account for 25% to 30% of residential heating and cooling energy use, making proper installation critical to energy performance.
How to Install French Doors Step by Step
French doors are installed step by step through a process that begins with preparing the rough opening, progresses through setting and securing the pre-hung unit, and finishes with hardware, sealing, and trim. The sequence matters because each step depends on the previous one being completed correctly. A frame set into an out-of-square opening will bind. Shims placed incorrectly will allow the frame to bow when insulation is applied. Hardware installed on a frame that is not plumb will not engage properly. Getting the early steps right eliminates problems in every step that follows.
The U.S. French door market generated $8.4 billion in revenue in 2024, according to GM Insights, and pre-hung installation is the dominant method because it delivers the most reliable result for both professional installers and experienced homeowners. Pre-hung units arrive with the door panels already mounted on hinges inside a complete jamb assembly, which means the hinge spacing, reveal gaps, and strike alignment are factory-set before the unit ever reaches the job site.
Is It Hard to Install French Doors Yourself?
Installing French doors yourself is a moderately difficult project that requires two people, basic carpentry tools, and careful attention to plumb, level, and square at every stage. The installation itself is not conceptually complex, but the tolerances are tight. A 1/16-inch error in plumb on a standard 80-inch-tall door translates to a visible gap difference between the top and bottom of the door, and that gap affects both the seal and the latch engagement. The double-door configuration of French doors compounds this sensitivity because both panels must align with each other and with the frame simultaneously.
Interior French door installation is the more forgiving of the two because interior doors do not require waterproofing, sill pans, or flashing. Exterior French door installation adds sill pan installation, flashing tape application, waterproof caulking, and weatherstripping that must create a continuous barrier against wind-driven rain. In Florida, exterior installation also requires a building permit and a final inspection that verifies the product's Florida Product Approval or Miami-Dade NOA certification and the compliance of the installation with the manufacturer's approved detail.
For impact-rated impact doors in the High Velocity Hurricane Zone, professional installation is strongly recommended because the specific anchor patterns, fastener types, and fastener spacing required by the product's NOA must match the approved installation detail exactly. A failed inspection requires rework, and incorrect fastener placement can compromise the door's structural rating.
Do French Doors Have to Be in Pairs?
No, French doors do not have to be in pairs. Single French doors, which use one operable glass panel paired with a fixed sidelight or mounted alone in a standard door frame, are a common configuration for narrower openings. The classic double French door uses two operable panels that swing open from the center, but single-panel French doors serve the same aesthetic purpose in spaces where the opening width does not accommodate two full panels.
Double French doors require a minimum rough opening width of approximately 62 inches (for a 60-inch door unit) to fit both panels with proper clearance. Single French entry doors fit standard 36-inch or 32-inch single-door rough openings. The choice between single and double depends on the available wall space, the desired opening width, and whether the homeowner wants both panels to operate independently.
Do French Doors Typically Open In or Out?
French doors open in (inswing) or out (outswing) depending on the application, the available floor space, and the regional building requirements. Interior French doors almost always open inward, into the room being entered. Exterior French doors can be configured either way, but outswing is the preferred configuration in hurricane zones because the door presses into the frame under wind pressure rather than pulling away from it, which provides inherently better resistance to both storm forces and forced entry.
Inswing exterior French doors require clear floor space on the interior side of the opening equal to the full swing arc of both panels. Outswing doors require that same clearance on the exterior side. In homes where a patio, deck, or covered lanai is immediately outside the opening, outswing doors are practical because the outdoor space provides natural clearance. The hinge placement also differs: outswing doors place the hinges on the exterior, which requires non-removable hinge pins or security hinges to prevent the pins from being driven out from the outside.
What Is the Standard Opening for French Doors?
The standard opening for French doors is 72 inches wide by 80 inches tall for the door unit, which requires a rough opening of approximately 74 inches wide by 82.5 inches tall.
Door Unit Size
Door Width (inches)
Rough Opening Width (inches)
Rough Opening Height (inches)
Common Application
5-foot double
60
62
82.5
Interior rooms, narrow patios
6-foot double (standard)
72
74
82.5
Most residential exterior and interior
8-foot double
96
98
82.5
Large patios, wide openings
6-foot double, 8-ft height
72
74
98.5
Homes with 9- or 10-foot ceilings
Sources: Angi standard French door sizing guide; Hotian Windows rough opening specifications; Doors and Beyond measurement reference.
The 2-inch width difference and 2.5-inch height difference between the door unit and the rough opening provide the space needed for shimming, leveling, insulating, and minor adjustments during installation. Measuring the rough opening at three points across the width and three points along the height, and using the smallest measurement at each axis, gives the most accurate working dimensions.
What Is the Rough Opening for a 6-Foot French Door?
The rough opening for a 6-foot French door is approximately 74 inches wide by 82.5 inches tall. The 74-inch width provides 1 inch of clearance on each side of the 72-inch door frame for shimming, leveling, and insulation. The 82.5-inch height provides 2.5 inches above the 80-inch door for the head jamb and adjustment space. These clearance dimensions are consistent across most manufacturers, but the specific product's installation instructions should always be consulted because some units require slightly more or less clearance.
If the existing rough opening is larger than the required dimensions, the excess space can be filled with additional framing (sister studs or furring strips) to bring the opening to the correct size. If the opening is smaller, the framing must be modified by removing and repositioning the jack studs and potentially resizing the header. Modifying load-bearing walls requires structural assessment to verify that the new header adequately supports the loads above the opening.
How to Frame an Opening for French Doors
Framing an opening for French doors requires a king stud on each side, a jack stud (trimmer) inside each king stud, a structural header spanning the top, and a flat sill plate at the bottom for exterior installations. The header carries the load from the wall structure above the opening down through the jack studs to the foundation. Header sizing depends on the span of the opening and the loads it carries: a 6-foot opening in a load-bearing wall typically requires a doubled 2x10 or 2x12 header, depending on the floor and roof loads above.
The king studs run from the sole plate to the top plate of the wall and transfer the header load to the foundation. The jack studs run from the sole plate to the underside of the header and directly support the header's weight. The combination of king and jack studs on each side creates a rigid frame that resists both vertical loads and lateral forces. For custom design openings wider than 8 feet, engineered lumber headers (LVL or PSL) may be required to span the opening without sagging.
What Are the Common Mistakes When Framing a Door Opening?
The common mistakes when framing a door opening for French doors are undersizing the header, cutting the rough opening too tight, failing to check for plumb and level before installing the door, omitting the sill pan on exterior installations, and using standard expanding foam instead of low-expansion foam around the frame.
- Undersizing the header causes the wall above the opening to sag over time, which pushes the top of the door frame inward and makes the doors bind at the top. The header must be sized by a qualified professional for the specific span and load conditions of the wall.
- Cutting the rough opening too tight leaves insufficient clearance for shimming and adjustment. The result is a frame that cannot be made plumb and level because there is no room to insert shims between the frame and the framing.
- Failing to verify plumb and level before setting the door unit means any framing errors get built into the installation permanently. Checking the jack studs for plumb and the header for level before the door goes in takes 5 minutes and prevents hours of rework.
- Omitting the sill pan on exterior doors allows water to penetrate beneath the threshold and enter the subfloor and wall cavity. Water damage from a missing sill pan can go undetected for years, causing mold growth and structural rot inside the wall.
- Using standard expanding foam instead of low-expansion foam generates enough pressure as it cures to bow the door jambs inward by 1/8 to 1/4 inch, which prevents the doors from closing properly. Low-expansion foam fills the gap without exerting significant pressure on the frame.
How to Install Pre-Hung French Doors
Pre-hung French doors are installed by preparing the opening, dry-fitting the unit, shimming the frame plumb and level, securing it to the framing, insulating the gaps, installing hardware, and finishing with trim.
- Remove the existing door, trim, and any old framing components from the rough opening. Clean the opening of debris, nails, and old caulk. For exterior installations, install a sill pan at the base of the opening by applying waterproof caulk to the subfloor, pressing the pan into the caulk, and covering it with self-adhesive flashing tape that extends up both sides of the opening.
- Dry-fit the pre-hung unit by tilting it into the rough opening without fasteners. Check that the unit sits centered in the opening with roughly equal clearance on each side and at the top. Verify that the threshold sits flat on the sill pan (exterior) or the subfloor (interior). This dry fit reveals any issues with the opening dimensions before sealants are applied.
- Start shimming on the hinge side. Place shims behind each hinge location and at 12- to 16-inch intervals between the hinges. Use a 6-foot level to check plumb on the hinge-side jamb. Adjust the shims until the jamb reads perfectly plumb along its full height.
- Shim the head jamb (top) to level. Place shims between the head jamb and the header at 12- to 16-inch intervals. Check for level across the full width. A level head jamb produces an even reveal gap across the top of both door panels.
- Shim the strike side (the side opposite the hinges). Check plumb and adjust until the strike-side jamb mirrors the hinge-side jamb. At this point, the entire frame should be plumb on both sides and level across the top, with consistent shimming at regular intervals.
- Secure the frame by driving 3-inch screws through the hinge-side jamb at each shim location, through the shims, and into the king or jack studs. Use at least two screws at each hinge location, replacing the short hinge screws with 3-inch screws that reach into the structural framing. Secure the strike side and head jamb with finishing nails or screws at each shim point.
- Test the doors before completing the fastening. Open and close both panels. Verify that the latch engages smoothly, the reveal gap is consistent (1/8 to 3/16 inch) on all sides, and neither panel rubs against the frame or the other panel. If binding occurs, adjust the shims and re-test before proceeding.
- Insulate the gap between the door frame and the rough opening with low-expansion spray foam. Apply the foam in thin passes, filling no more than one-third of the gap depth per pass, and allow each pass to expand before adding more. Overfilling bows the frame.
- Install the astragal, flush bolts, multi-point lock, and handle hardware according to the manufacturer's instructions. Test all locking points for smooth engagement.
- Apply weatherstripping along the frame perimeter and the astragal. Verify compression by closing the doors and checking for daylight around the edges. Adjust the weatherstripping if gaps are visible.
- Install interior and exterior trim (casing) to cover the gap between the door frame and the wall surface. For exterior trim, apply a continuous bead of exterior-grade caulk around the perimeter of the trim where it meets the siding to prevent water intrusion behind the trim.
How to Toe and Heel French Doors
Toeing and heeling French doors means placing packers (shims) at specific locations around the glass pane within the door panel to prevent the glass from shifting and to keep the panel square. The term comes from the practice of placing a packer at the "toe" (bottom corner on the closing side) and the "heel" (bottom corner on the hinge side) of each glass pane. Proper toe and heel packing transfers the weight of the glass to the correct points in the frame, which prevents the door panel from sagging or racking over time.
In a French door panel, the glass occupies most of the panel area, and the weight of that glass creates downward and diagonal forces that the frame must resist. Toe and heel packers distribute those forces to the corners of the panel where the frame joints are strongest. Without proper packing, the glass weight pulls the closing side of the panel downward, which causes the panel to drop at the latch side, the gap at the top to widen on the latch side, and the latch to misalign with the strike plate.
How Big Should the Gap Be Between French Doors?
The gap between French doors should be 1/8 to 3/16 inch (approximately 3 to 5 millimeters) on each side where the door panel meets the frame, and the same 1/8- to 3/16-inch gap where the two panels meet at the center astragal. This gap, called the reveal, provides clearance for the door to swing freely without rubbing against the frame or the opposing panel, while remaining narrow enough for the weatherstripping to compress and create an air and water seal when the doors are closed.
A reveal that is too tight causes the panels to rub and bind during operation, which wears the finish and makes the doors difficult to open and close. A reveal that is too wide allows air infiltration, reduces sound insulation, and prevents the weatherstripping from compressing enough to seal properly. The 1/8- to 3/16-inch range represents the optimal balance between clearance and seal compression for standard residential French doors.
Consistent reveal around all edges of both panels is the visual and functional indicator of a properly installed French door. Inconsistent reveal, where the gap is wider at the top than the bottom or wider on one side than the other, indicates that the frame is not plumb, not level, or both.
What Is the Seal Between French Doors Called?
The seal between French doors is called an astragal. The astragal is the vertical strip mounted to the inactive door panel (the panel that stays fixed during normal daily use) that closes the gap where the two panels meet at the center when both doors are shut. The astragal houses the weatherstripping that seals against wind, rain, and air infiltration, and it contains the flush bolt receivers and strike plates that the active panel's lock engages against.
Hurricane-grade astragals used on impact-rated French doors in South Florida incorporate reinforced strike plates, glass-filled nylon bolts, and spring-loaded sealing boots that automatically adjust to maintain a watertight barrier under extreme wind pressure. The astragal is one of the most performance-critical components in a French door system because it seals the most vulnerable point: the center joint where two independently moving panels must create a continuous barrier.
How to Seal and Weatherproof French Doors
Sealing and weatherproofing French doors requires applying weatherstripping along the full perimeter of the frame, compressing the astragal seal at the center meeting point, caulking the exterior trim, and verifying that the sill pan and threshold drain properly.
Weatherstripping comes in several forms for French doors: compression weatherstripping (foam or rubber strips that compress when the door closes), fin-seal weatherstripping (a flexible fin that wipes against the door edge), and magnetic weatherstripping (a magnetic strip that pulls the door tight against the frame). Compression weatherstripping is the most common for residential French doors because it provides reliable sealing with moderate closing force.
The astragal seal is the most important weatherproofing point because the center of the door, where the two panels meet, has no rigid frame member behind it. The seal at the astragal depends entirely on the weatherstripping compression and the flush bolt engagement to maintain contact. Multi-point locking systems compress the astragal seal at multiple heights simultaneously, which produces a more even seal than a single lock at handle height.
ENERGY STAR certified doors reduce heating and cooling costs by up to 13% compared to non-certified products, according to the EPA. Achieving that performance requires proper sealing at every joint: frame to wall, door to frame, and panel to astragal. A door fitting assessment verifies that all seal points are performing correctly after installation.
How to Properly Secure French Doors
Properly securing French doors requires a multi-point locking system, reinforced astragal strike plates, 3-inch hinge screws that reach structural framing, and, for exterior doors, laminated or impact-rated glass.
Multi-point locks engage steel hooks, bolts, and latches at three or more locations along the height of the door frame and astragal. This distributed locking approach prevents prying at any single point because force applied at one location is resisted by all lock points simultaneously. Single-point locks, which engage only at handle height, leave the top and bottom of the door vulnerable to spreading.
The 3-inch hinge screws serve a security function beyond structural attachment. Standard hinge screws (typically 3/4 inch) secure the hinge only to the door jamb, which can be kicked away from the framing. Three-inch screws pass through the jamb and into the king or jack stud, anchoring the hinge side of the door to the wall structure. In hurricane zones, the anchor pattern for impact-rated impact French doors specifies exact fastener types and locations that exceed standard security requirements.
Impact glass adds the final layer of security. Laminated glass holds together even after impact, preventing an intruder from breaking through the glass to reach the lock from the inside. The Insurance Institute for Business and Home Safety reports that 40% of hurricane structural damage occurs through window and door failures, and impact glass addresses that vulnerability while simultaneously providing forced-entry resistance.
Do French Doors Leak More Than Sliding Doors?
French doors do not leak more than sliding doors when properly installed with a sill pan, adequate weatherstripping, and a correctly adjusted astragal. The perception that French doors are more leak-prone comes from the center meeting point where the two panels join, which does not exist on a single-track sliding door. The astragal and its weatherstripping seal this center joint, and when the astragal is properly installed and the multi-point lock compresses the seal at multiple heights, the center joint achieves water resistance comparable to the frame-to-panel seal on a sliding door.
Improper installation, not the door type, is the primary cause of French door leaks. Missing sill pans, inadequate caulking, compressed or missing weatherstripping, and flush bolts that do not engage fully all create pathways for water intrusion. Sliding doors have their own leak points: the bottom track collects debris and water, and the rollers wear over time, which reduces the compression of the interlock seal. Both door types perform well when installed correctly and maintained regularly.
Frequently Asked Questions
Is There a Difference Between French Doors and Double Doors?
Yes, the primary difference between French doors and double doors is the glass. French doors feature full-length or near-full-length glass panels that maximize natural light and visual openness. Double doors can be solid panel doors, partially glazed doors, or fully glazed doors. All French doors are double doors, but not all double doors are French doors. The defining characteristic of a French door is the glass-dominant panel design that originated in 17th-century France.
What Do You Call a French Door That Only Opens on One Side?
A French door that only opens on one side is called a single-action French door or a French door with a fixed panel. The fixed panel does not swing open; it remains stationary in the frame. The operable panel swings open against the fixed panel or against the frame, depending on the configuration. Single-action French doors are common in narrower openings where only one panel width of passage is needed.
What Does an Astragal Look Like?
An astragal looks like a narrow vertical strip, typically 1 to 2 inches wide, that runs the full height of the door on the edge of the inactive panel. The visible face of the astragal is usually a flat or slightly rounded profile that matches the finish of the door frame. Behind the visible face, the astragal contains channels for weatherstripping, recesses for flush bolt receivers, and reinforcement for strike plates. On impact-rated doors, the astragal is wider and more heavily reinforced.
How Long Does It Take to Install French Doors?
Installing French doors takes 4 to 8 hours with a two-person crew for a pre-hung unit in an existing opening. New openings that require framing modification add 2 to 4 hours of carpentry work. Impact-rated exterior installations in the HVHZ take longer because the specific anchor patterns, fastener types, and sealing protocols must match the manufacturer's approved installation detail and must pass building department inspection.
How Do You Install French Doors in an Existing Opening?
You install French doors in an existing opening by removing the old door and trim, cleaning the rough opening, verifying the dimensions against the new door unit, installing a sill pan for exterior applications, dry-fitting the pre-hung unit, shimming it plumb and level, securing the frame with 3-inch screws at shim locations, insulating with low-expansion foam, installing hardware, and finishing with trim and caulk. The existing rough opening must be the correct size for the new unit or be modified with additional framing.
How Do You Install Interior French Doors?
You install interior French doors using the same shimming, leveling, and securing process as exterior doors, but without the sill pan, flashing, or exterior weatherproofing steps. Interior French doors do not require a building permit in Florida. The glass in interior French doors can be clear, frosted, or textured depending on the privacy needs of the space. Interior trim is applied to both sides of the frame, and the finish is typically matched to the room's existing door and baseboard profiles.
Putting It All Together
French door installation is a sequence where each step builds on the one before it. A properly framed opening produces a plumb and level frame. A plumb and level frame produces consistent reveal gaps. Consistent gaps produce smooth operation and effective sealing. Effective sealing produces the energy performance and weather resistance that make the investment worthwhile. When the sequence is followed precisely, the result is a door that operates smoothly, seals tightly, and looks exactly as intended for decades.
For homeowners who want the job done right the first time, with products that meet Florida's building code and pass inspection on the first visit, ASP Windows & Doors handles every step from measurement through final inspection.
Call us at (888) 782-8342 or request a free estimate to get started.
Now Accepting Appointments
Proudly serving homeowners and businesses across South Florida and Southwest Florida. Book your visit and let our experts help protect and upgrade your space.
.avif)
.avif)
.avif)
%201.avif)
Insights & Resources
Stay informed with expert tips on impact windows, hurricane protection, and South Florida building standards.


%201.webp)
%201%20(1).webp)
%201.svg)
%201%20(1)%20(1).webp)
.png%20(1).webp)
.png.webp)
.avif)
.avif)


.avif)


.png)
.png)